Vertical Placement of Vibroplex Style Speed Keys
I've been using speed keys since 1958 but I've never experimented with trying to place them vertically until recently. The articulated damper assembly of Vibroplex Original keys are designed to be used horizontally. So it requires a slight modification for vertical operation. Which takes only a few minutes as below:
1. Lock the articulated damper arm in place by wrapping string or fishing line around the bottom of the damper assembly and around the articulated arm so that the articulated arm is held firmly in place.
2. Lock the damper ring in place by securing it with its screw.
3. Place a rubber O ring of the proper size around the damper wheel or replace the metal damper wheel with a rubber wheel of the same size. Hardware stores have rubber wheels of the type used in faucet repair and you should be able to find the correct diameter needed.
See the below picture of the easily modified damper with the rubber O ring.
Now, all the dampening of the dot arm will take place on the damper wheel itself. But in all cases, when I'm using a Vibroplex with an articulated damper, I always lock the articulated damper in place to begin with. There's more info on why in the speed key adjustment procedure later.
All of the other Vibroplex keys such as the Lightning, Champion & Model X can be placed vertically by simply modifying the damper by locking the damper wheel in place and using a rubber O ring around the damper wheel. Such as described above.
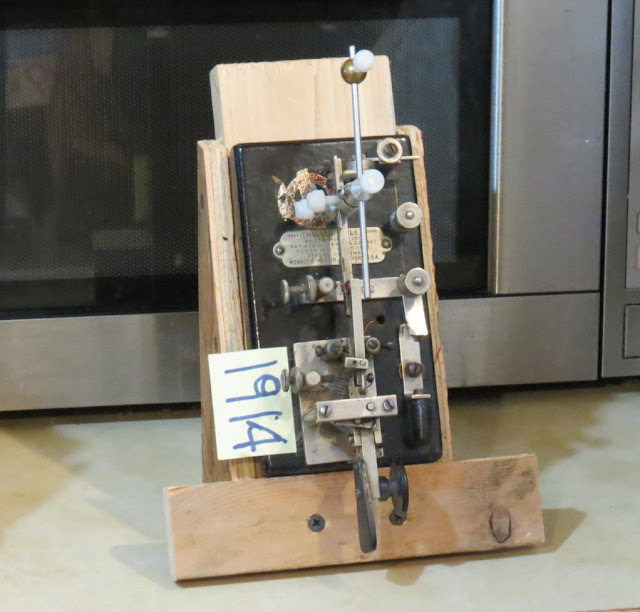
Next I experimented with 90 degree vertical placement of the key but I wasnt happy with the quality of the dots compared to a horizontal key. So then I tried a placement of 75 degs -- so that the heavy key is tipped slightly off vertical. And then I noticed the quality of dots produced equals the keys placed horizontally. I made a wooden support at a 75 deg angle for the key--- as in the below pictured with a Model X Vibroplex. The Model X dosnt use an articulated damper so it can be easily placed vertically by simply placing a rubber O ring around the damper wheel. I equipped the Mod X with a sliding speed control rod for quick speed changes from fast to slow. The Mod X key works exceptionally well in the 75 deg vertical position. Its held to the wooden support strictly by gravity. So different keys can be swapped out quickly for testing.
Pictured are the Mod X , the Modified articulated Damper, and a Vibroplex Original on the 75 deg wooden support. The modification to the damper assembly takes only a few minutes to wrap string or dental floss around the articulated damper and to add the rubber O ring around the damper wheel on an Original Vibroplex. The vertical placement of the keys works so well that my next project is to is made one using something other than scrap wood.
Plus I'll be adding some of the speed key adjustment tricks that I've learned over the past 60 years.


Speed key Adjustment Procedures
Note: In the 1950/1960's the Navy required anyone using a speed key to first pass a speed key test.. which was to send over 20wpm for 10 minutes with no errors. Then they were allowed to use a speed key. Speed keys were never designed to send below 20 wpm to begin with. The critical part on speed keys is the Main spring. If the main spring is very weak, then it allow for slower dots. But a weak main spring causes the key to be very difficult to send with and it wont produce long springs of dots as required ---nor will it work well at the higher speeds. So the type main spring material and length is critical to producing high quality dots. The worst main spring I've ever found was on a WW2 Lionel J36.. its main spring was so weak that it could only make 3 or 4 dots in a row. The second worst key I've ever tested was an EF Johnson speed key which had a main spring so weak that it could barely make 5 or 6 dots in a row. If the keys main spring is robust and short, the key will make an almost endless stream of dots. If the main spring is too long, the dot arm will flop around on the damper too much. So a very robust short main spring is needed to produce high quality code at all speed ranges. Over the years there were a wide variety of different type main springs used on keys. The first keys made in 1905 used a rather long main spring and it wasn't till about 1912 that Vibroplex keys became available with shorter main springs. The longer main springs used in 1905 caused the keys to be more difficult to send high speed code over 30wpm. And in those days it was all about sending fast --since you were paid by the number words sent. I acquired quite a few vintage 1905 era keys for testing. As well as a wide range of other keys of all types and years up until todays keys. It's possible to send down into the 12 wpm range with a speed key provided you dont load the dot arm up with large amounts of weight. All the extra weight causes the key to become awkward to send with. So the proper way is to extend a smaller amount of weight slightly behind the key in order to slow it down. Which will allow producing high quality dots at all speed ranges.
The new Vibroplex Presentation speed key I acquired in 1958 seemed to take a long period of time before I was comfortable with how it sent code. Since I had never used nor adjusted a speed key before. And there are some tricks in how to go about it.. Mainly its a learning experience in how the adjustments interact ---but once you find the keys sweet spot, then the code will seem to roll off the finger pieces effortlessly .. The main thing is to set the right stop screw so that the dot arm just touches and damper wheel at idle. Then set the left side stop screw for about 3/32" of travel of the dot arm. Then set the dot contact thumb screw so that the dot contacts make and break to produce dots with the proper 3 to 1 dot ratio. Which is a very critical adjustment for a dot ratio of 3 to 1. You can use an old analog VOM across the dot contacts and set the post screw so that the Vom has a 50% defection. Or you can simply watch and listen to the dots being produced and set it for the proper 3 to 1 weighting by ear. Tweaking the contact spacing and dot side coil spring tension for best code. I've adjusted so many keys that I can usually adj the key simply by watching and listening to the make and break of the dot contacts. You dont want the dot side coil spring tension to be so high as to cause the dot arm to hit the damper with too much force. If it hits the damper with too much force, that can cause the dot arm to bounce back towards the dot contact and produce dot stutter. The requirement is to adjust the dot side coil spring tension so that the dot arm hits the damper with the very minimum force necessary to produce very high quality dots. & setting the dot side coil spring tension is the most critical adjustment for proper operation of the key. Something else critical is to have all the piece parts squarely lined up perfectly with no corrosion on any parts.. especially on the straps under the key .. the straps & screws on the bottom of the key need to have low resistance over to the wire terminals. What I've noticed is the keys that come from coastal areas near salt water or coal fired power plants suffer the most from corrosion. & Solid state rigs have no tolerance for anything except near zero ohms across the contacts. Or else the rig will transmit scratchy sounding dots. What I've done on most keys is place small braid or thin wire from both the dash & dot arm to ground. Which bypasses the need for the current path to pass through the pivot bearings. The Deluxe Jeweled bearing Vibroplex keys already come equipped with braid to ground. Which is the way all keys should have been made.
Now its time to talk about the myth of the dot stabilizer. Ted McElroy started placing mechanical dot stabilizers on his deluxe keys around 1939. Ted was the first to employ a mechanical dot stabilizer on speed keys. Which was a mechanical arm that applied a tiny amount of pressure to the U shaped dot contact spring in order to stop it from self oscillating in-between series of dots. What was happening (only) on the McElroy keys was the dot contact assembly U shaped spring was self oscillating before coming to rest. You can see the self oscillation by using a magnifying glass to watch the dot contact U shaped spring assembly after making a series of dots. The reason the McElroy keys dot contact assemblies went into self oscillation after making a series of dots was the dot contact assemblies he was making were designed wrong. None of the other speed keys being made had a problem with self oscillation of the dot contact assembly in-between series of dots. I've tested large numbers of Vibroplex style keys from all years of manufacture from 1905 till today and none of them suffer from self oscillation of the dot contact assembly ---except for the McElroy keys. So there is no reason to consider using a dot contact stabilizer on any key except the McElroy keys. The fix is to wrap about 10 turns of fine thread such as dental floss around the U shaped dot contact spring and bias it slightly back towards the dot arm. On some keys it might be necessary to open up the U spring a bit by placing an object like a pencil in the gap and slightly bending the U shape open a little more. That way wrapping the string around it will bias it slightly towards the dot arm. That will prevent the self oscillation of the McElroy dot contact assembly. I've also tested all the years of manufacture of the Les Logan keys etc.. . None of them have the self oscillation problem of the dot contact assembly. All Ted McElroy would have had to do on his keys was to copy how Vibroplex made their dot contact assemblies and that would have solved the self oscillation problem that plagues most all of the McElroy keys. Later production of Mac keys in Chicago had an even worse case of dot contact assembly self oscillation. And to make it even worse---- on his deluxe keys that he provided with the mechanical dot stabilizer arm, the stabilizer arm had to be adjusted so it just barely touched the dot contact assembly spring while at idle or it would kill the dots. And it went out of adjustment constantly ---and killed the dots. The proper way to fix the old Mac keys is to wind some turns of thread around the dot contact spring assembly and lock them in place with some super glue or other type glue. Biasing the U shaped spring slightly towards the dot arm. That will prevent it from self oscillating before coming to rest. And then get rid of the goofy ass'ed mechanical dot stabilizer. Use a magnifying glass to be sure its not self oscillating after producing a string of dots.
A number of years ago I purchased an old Wilcox speed key made in Canada and I was shocked that it came equipped with a goofy ass'ed mechanical dot stabilizer (killer)_ !!! So even Wilcox was fooled by the Myth of the dot stabilizer ((((( And its still happening today!!! If you have a key that suffers from dot stutter.. then its probably because your using too much dot side coil spring tension .. which causes the dot arm to smash into the damper with too much force.. causing the dot arm to be forced backwards towards the dot contact assembly .. which makes the key difficult to send with and can produce dot stutter.
But here some something interesting.. Ted McElroy was the only one to ever use a damper assembly that allowed the damper wheel position to be changed up or down. But he only provided it on a limited number of keys. Being able to change the position of the wheel allowed the dot arm to force the wheel upward .. and an upward travel of the dampening wheel works best to dampen the dot arm.
Now lets talk about the proper alignment of the parts on the key. Out of the large numbers of speed keys I've acquired over the past 60 years, only one of them came properly adjusted for making decent code. It was a 1948 Deluxe Vibroplex Original in its original carry box. I purchased it from the original owner in 2002. When I opened the carry box and took the key out, the key was in perfect like new condition with all the piece parts lined up perfectly. Plus there was no corrosion on any of the piece parts. & when I placed it on the ham bands, it made perfect code with no tweaking necessary. Most all the other used keys I acquired came with all the piece parts totally out of alignment and all parts of the key dirty with rust and corrosion. And it can take many hours to tear the key apart to clean every piece part of corrosion and re-align it all perfectly.. And its only then that you can expect it to produce high quality code as good as machine generated!!!
Most of the older keys made before the 1960's were used commercially and were all beat up from years of hard use.. but every once in a while ---one shows up that is in like new condition. I acquired a 1932 Vibro Lighting that had never been abused in any way and it had all the original piece parts ---plus the original contacts were also still like new with no pitting. So the key had never been used commercially or abused in any way. And such an old key that was so well taken care of is a real pleasure to use on the ham bands and a wonderful part of key history :-)
In the days of land line telegraph and vacuum tube keying, large amounts of current travel through the keys contacts. Causing contact wear and tear with pitting. So contacts didnt last long in those early days of telegraphy. And it required constant repair and re-alignment of the contacts. Unlike today when there is very minimal amounts of current flowing in order to key solid state rigs.
During WW2 Vibroplex used high quality main springs of the proper length on their keys. And so did Bunnell on their WW2 J36 keys. I prefer to use the WW2 Bunnell J36 keys due to the robust high quality short main springs which allowed producing very high quality code over 40wpm.
Frank W7IS
1. Lock the articulated damper arm in place by wrapping string or fishing line around the bottom of the damper assembly and around the articulated arm so that the articulated arm is held firmly in place.
2. Lock the damper ring in place by securing it with its screw.
3. Place a rubber O ring of the proper size around the damper wheel or replace the metal damper wheel with a rubber wheel of the same size. Hardware stores have rubber wheels of the type used in faucet repair and you should be able to find the correct diameter needed.
See the below picture of the easily modified damper with the rubber O ring.
Now, all the dampening of the dot arm will take place on the damper wheel itself. But in all cases, when I'm using a Vibroplex with an articulated damper, I always lock the articulated damper in place to begin with. There's more info on why in the speed key adjustment procedure later.
All of the other Vibroplex keys such as the Lightning, Champion & Model X can be placed vertically by simply modifying the damper by locking the damper wheel in place and using a rubber O ring around the damper wheel. Such as described above.
Next I experimented with 90 degree vertical placement of the key but I wasnt happy with the quality of the dots compared to a horizontal key. So then I tried a placement of 75 degs -- so that the heavy key is tipped slightly off vertical. And then I noticed the quality of dots produced equals the keys placed horizontally. I made a wooden support at a 75 deg angle for the key--- as in the below pictured with a Model X Vibroplex. The Model X dosnt use an articulated damper so it can be easily placed vertically by simply placing a rubber O ring around the damper wheel. I equipped the Mod X with a sliding speed control rod for quick speed changes from fast to slow. The Mod X key works exceptionally well in the 75 deg vertical position. Its held to the wooden support strictly by gravity. So different keys can be swapped out quickly for testing.
Pictured are the Mod X , the Modified articulated Damper, and a Vibroplex Original on the 75 deg wooden support. The modification to the damper assembly takes only a few minutes to wrap string or dental floss around the articulated damper and to add the rubber O ring around the damper wheel on an Original Vibroplex. The vertical placement of the keys works so well that my next project is to is made one using something other than scrap wood.
Plus I'll be adding some of the speed key adjustment tricks that I've learned over the past 60 years.


Speed key Adjustment Procedures
Note: In the 1950/1960's the Navy required anyone using a speed key to first pass a speed key test.. which was to send over 20wpm for 10 minutes with no errors. Then they were allowed to use a speed key. Speed keys were never designed to send below 20 wpm to begin with. The critical part on speed keys is the Main spring. If the main spring is very weak, then it allow for slower dots. But a weak main spring causes the key to be very difficult to send with and it wont produce long springs of dots as required ---nor will it work well at the higher speeds. So the type main spring material and length is critical to producing high quality dots. The worst main spring I've ever found was on a WW2 Lionel J36.. its main spring was so weak that it could only make 3 or 4 dots in a row. The second worst key I've ever tested was an EF Johnson speed key which had a main spring so weak that it could barely make 5 or 6 dots in a row. If the keys main spring is robust and short, the key will make an almost endless stream of dots. If the main spring is too long, the dot arm will flop around on the damper too much. So a very robust short main spring is needed to produce high quality code at all speed ranges. Over the years there were a wide variety of different type main springs used on keys. The first keys made in 1905 used a rather long main spring and it wasn't till about 1912 that Vibroplex keys became available with shorter main springs. The longer main springs used in 1905 caused the keys to be more difficult to send high speed code over 30wpm. And in those days it was all about sending fast --since you were paid by the number words sent. I acquired quite a few vintage 1905 era keys for testing. As well as a wide range of other keys of all types and years up until todays keys. It's possible to send down into the 12 wpm range with a speed key provided you dont load the dot arm up with large amounts of weight. All the extra weight causes the key to become awkward to send with. So the proper way is to extend a smaller amount of weight slightly behind the key in order to slow it down. Which will allow producing high quality dots at all speed ranges.
The new Vibroplex Presentation speed key I acquired in 1958 seemed to take a long period of time before I was comfortable with how it sent code. Since I had never used nor adjusted a speed key before. And there are some tricks in how to go about it.. Mainly its a learning experience in how the adjustments interact ---but once you find the keys sweet spot, then the code will seem to roll off the finger pieces effortlessly .. The main thing is to set the right stop screw so that the dot arm just touches and damper wheel at idle. Then set the left side stop screw for about 3/32" of travel of the dot arm. Then set the dot contact thumb screw so that the dot contacts make and break to produce dots with the proper 3 to 1 dot ratio. Which is a very critical adjustment for a dot ratio of 3 to 1. You can use an old analog VOM across the dot contacts and set the post screw so that the Vom has a 50% defection. Or you can simply watch and listen to the dots being produced and set it for the proper 3 to 1 weighting by ear. Tweaking the contact spacing and dot side coil spring tension for best code. I've adjusted so many keys that I can usually adj the key simply by watching and listening to the make and break of the dot contacts. You dont want the dot side coil spring tension to be so high as to cause the dot arm to hit the damper with too much force. If it hits the damper with too much force, that can cause the dot arm to bounce back towards the dot contact and produce dot stutter. The requirement is to adjust the dot side coil spring tension so that the dot arm hits the damper with the very minimum force necessary to produce very high quality dots. & setting the dot side coil spring tension is the most critical adjustment for proper operation of the key. Something else critical is to have all the piece parts squarely lined up perfectly with no corrosion on any parts.. especially on the straps under the key .. the straps & screws on the bottom of the key need to have low resistance over to the wire terminals. What I've noticed is the keys that come from coastal areas near salt water or coal fired power plants suffer the most from corrosion. & Solid state rigs have no tolerance for anything except near zero ohms across the contacts. Or else the rig will transmit scratchy sounding dots. What I've done on most keys is place small braid or thin wire from both the dash & dot arm to ground. Which bypasses the need for the current path to pass through the pivot bearings. The Deluxe Jeweled bearing Vibroplex keys already come equipped with braid to ground. Which is the way all keys should have been made.
Now its time to talk about the myth of the dot stabilizer. Ted McElroy started placing mechanical dot stabilizers on his deluxe keys around 1939. Ted was the first to employ a mechanical dot stabilizer on speed keys. Which was a mechanical arm that applied a tiny amount of pressure to the U shaped dot contact spring in order to stop it from self oscillating in-between series of dots. What was happening (only) on the McElroy keys was the dot contact assembly U shaped spring was self oscillating before coming to rest. You can see the self oscillation by using a magnifying glass to watch the dot contact U shaped spring assembly after making a series of dots. The reason the McElroy keys dot contact assemblies went into self oscillation after making a series of dots was the dot contact assemblies he was making were designed wrong. None of the other speed keys being made had a problem with self oscillation of the dot contact assembly in-between series of dots. I've tested large numbers of Vibroplex style keys from all years of manufacture from 1905 till today and none of them suffer from self oscillation of the dot contact assembly ---except for the McElroy keys. So there is no reason to consider using a dot contact stabilizer on any key except the McElroy keys. The fix is to wrap about 10 turns of fine thread such as dental floss around the U shaped dot contact spring and bias it slightly back towards the dot arm. On some keys it might be necessary to open up the U spring a bit by placing an object like a pencil in the gap and slightly bending the U shape open a little more. That way wrapping the string around it will bias it slightly towards the dot arm. That will prevent the self oscillation of the McElroy dot contact assembly. I've also tested all the years of manufacture of the Les Logan keys etc.. . None of them have the self oscillation problem of the dot contact assembly. All Ted McElroy would have had to do on his keys was to copy how Vibroplex made their dot contact assemblies and that would have solved the self oscillation problem that plagues most all of the McElroy keys. Later production of Mac keys in Chicago had an even worse case of dot contact assembly self oscillation. And to make it even worse---- on his deluxe keys that he provided with the mechanical dot stabilizer arm, the stabilizer arm had to be adjusted so it just barely touched the dot contact assembly spring while at idle or it would kill the dots. And it went out of adjustment constantly ---and killed the dots. The proper way to fix the old Mac keys is to wind some turns of thread around the dot contact spring assembly and lock them in place with some super glue or other type glue. Biasing the U shaped spring slightly towards the dot arm. That will prevent it from self oscillating before coming to rest. And then get rid of the goofy ass'ed mechanical dot stabilizer. Use a magnifying glass to be sure its not self oscillating after producing a string of dots.
A number of years ago I purchased an old Wilcox speed key made in Canada and I was shocked that it came equipped with a goofy ass'ed mechanical dot stabilizer (killer)_ !!! So even Wilcox was fooled by the Myth of the dot stabilizer ((((( And its still happening today!!! If you have a key that suffers from dot stutter.. then its probably because your using too much dot side coil spring tension .. which causes the dot arm to smash into the damper with too much force.. causing the dot arm to be forced backwards towards the dot contact assembly .. which makes the key difficult to send with and can produce dot stutter.
But here some something interesting.. Ted McElroy was the only one to ever use a damper assembly that allowed the damper wheel position to be changed up or down. But he only provided it on a limited number of keys. Being able to change the position of the wheel allowed the dot arm to force the wheel upward .. and an upward travel of the dampening wheel works best to dampen the dot arm.
Now lets talk about the proper alignment of the parts on the key. Out of the large numbers of speed keys I've acquired over the past 60 years, only one of them came properly adjusted for making decent code. It was a 1948 Deluxe Vibroplex Original in its original carry box. I purchased it from the original owner in 2002. When I opened the carry box and took the key out, the key was in perfect like new condition with all the piece parts lined up perfectly. Plus there was no corrosion on any of the piece parts. & when I placed it on the ham bands, it made perfect code with no tweaking necessary. Most all the other used keys I acquired came with all the piece parts totally out of alignment and all parts of the key dirty with rust and corrosion. And it can take many hours to tear the key apart to clean every piece part of corrosion and re-align it all perfectly.. And its only then that you can expect it to produce high quality code as good as machine generated!!!
Most of the older keys made before the 1960's were used commercially and were all beat up from years of hard use.. but every once in a while ---one shows up that is in like new condition. I acquired a 1932 Vibro Lighting that had never been abused in any way and it had all the original piece parts ---plus the original contacts were also still like new with no pitting. So the key had never been used commercially or abused in any way. And such an old key that was so well taken care of is a real pleasure to use on the ham bands and a wonderful part of key history :-)
In the days of land line telegraph and vacuum tube keying, large amounts of current travel through the keys contacts. Causing contact wear and tear with pitting. So contacts didnt last long in those early days of telegraphy. And it required constant repair and re-alignment of the contacts. Unlike today when there is very minimal amounts of current flowing in order to key solid state rigs.
During WW2 Vibroplex used high quality main springs of the proper length on their keys. And so did Bunnell on their WW2 J36 keys. I prefer to use the WW2 Bunnell J36 keys due to the robust high quality short main springs which allowed producing very high quality code over 40wpm.
Frank W7IS

